Words: Sam Armitage Photos: Ben Gerrish

I loved watching monster trucks on TV as a kid. Growing up in rural Suffolk in the south of England, seeing giant stadiums full of roaring engines, fireworks and flames was super exciting. Grave digger is one of, if not the most iconic of all the monster trucks, plus we are massive fans of Halloween in my house (my sons birthday is the 28th and my wife’s birthday is the 29th of October!). After a nasty crash earlier this year resulted in a torn ACL I knew I had some time off the bike, so when I asked my son what I should do with my spare time away from riding and digging, his first response was to paint a grave digger bike. The apple doesn’t fall far from the tree…

Having purchased a basic airbrush a few months prior, I was super keen to teach myself a few new skills, and having time on my side meant I could really lean into the details. It was such an exciting experience learning and practicing, refining my skills, and seeing them evolve as the project progressed. The final result is better than I could have expected when I started. It's such a thrill to see your vision come to life piece by piece in front of you!

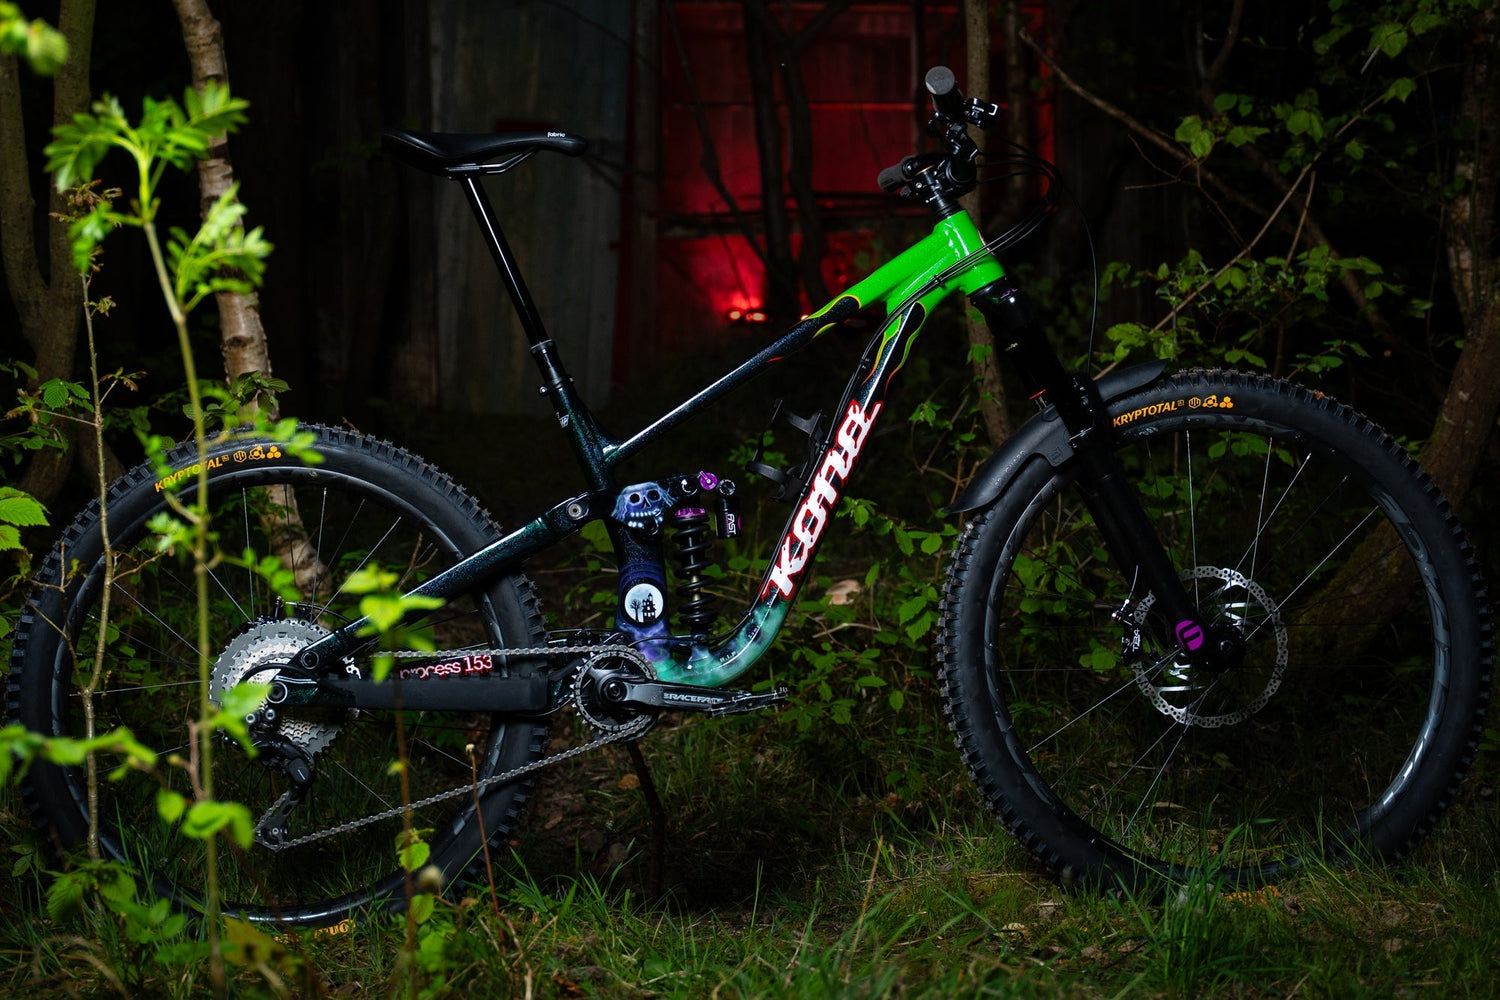
Starting with a brand new alloy Process 153 frame, I stripped it completely, masking off the bearing seats, starting with some serious sanding to remove the original paint and create a smooth surface for applying primer. With the primer on and dry, I started with a full covering of black as my main base colour. With the black laid down, I then added a layer of lacquer with a purple flake in it.

The first area of detail after the black was the flames…started with a yellow to red fade, then some significant masking and a layer or two of bright green, followed by yet another layer of lacquer, this time with a green flake. By now, it was already starting to look good, but the hardest parts were still to come. To ensure I had the option of erasing any mistakes, I sprayed 2 full coats of 2K clear over the top, sealing in the work I had already accomplished and allowing for any future mistakes to be removed without damaging the existing paint.

While the clear coat was curing, I designed the logos, using the standard Kona graphics, but giving them a grave digger edge by adding a red outline of dripping blood. I particularly liked getting the angle of the blood drips so they flowed vertically on the down tube. I looked at some angle measurements while drawing them to ensure they looked right! The devil is in the detail…

Logos designed, it was time to cut the vinyl to allow for a crisp, clean edge. Spraying first the white layer of the logos, then the red dripping blood. Unmasking the chainstay logo was a real treat; it lined up perfectly. Once I was happy with the logos, I turned my attention to the more freehand elements of the design. I studied the grave digger trucks, finding my favourite versions of the moon, skull, and graveyard. I drew up a haunted house and made a vinyl mask for that, but then airbrushed the moon with around five different shades of white, cream, and light grey. The graveyard tombstones and surrounding mist was the area I had been dreading, totally freehand, and any mistakes were almost impossible to remove as I was layering different shades of green and white to create the effect. I had to keep constantly checking to make sure I had a nice balance on both sides, as well as ‘just’ the right amount of detail. I breathed a massive sigh of relief when I finally called it and put down the airbrush!

With the design finished, it was time to seal it, so another few coats of 2K lacquer, three in total. This allowed me to give the bike a decent cure time, then a thorough sanding and polishing process to get a super smooth and glossy final result. The way the metallic flake pops in the sun has to be seen; a camera just cannot do it justice. Overall, I’m absolutely over the moon with the final result, and it’s got me excited for future projects, knowing I can really challenge myself and rise to it, bringing a vision to life and turning it into a functional object. What a thrill!
It’s now built up and ready for my first ride back post physio, which could be any day now! Can’t wait to rip some turns on this bad boy…

Here’s the parts list:
Frame: Kona Process 153 Alloy G3, large
Fork: Rockshox Yari with fast SC5 damper cartridge
Shock: Fast Fenix 2.0
Headset: Hope
Stem: Hope trail 45mm length
Bars: Reverse Vink, 50mm rise, cut to 760
Grips: Peatys Monarch
Dropper remote: Hope
Seatpost: OneUp V3 240mm
Saddle: Fabric Spoon

Brakes: Hope Tech 4 Evo, control levers
Rotors: Hope fixed 6 bolt, 220mm front, 200mm rear
Drivetrain: Shimano XT 11-speed, 11-46 cassette
Chainset: Race Face Aeffect, 165mm arms,
Chainring: Race Face narrow wide, 30-tooth
Bash guard: OneUp ISCG 05 under bash

Wheels: Chris King ISO hubs, Sapim d-light spokes, brass nipples, Race Face arc HD 30 rims
Tyres: Continental Kryptotal DH casing, 29x2.4 super soft front (23 psi), 27.5x2.4 soft rear (26psi)
PPF: Ride Wrap tailored
Extras: bottle cage, tool strap with tube, mech hanger, tyre lever, split link, and a small assortment of bolts. OneUp pump 100cc with OneUp EDC tool, tyre plugs, and another split link, zip ties inside the chainset axle. Can never be too prepared!